
We have many people asking us for step-by-step instructions of how to do certain techniques. Here is an exercise for making an applique of a word which can be applied to any number of projects – in this case we made a little practical zipper baggie. Obviously the name can change to whatever you require.
Of course, this method of digitizing and applique-in-the-hoop can be adapted for many other embroidery software programs. We have used Artistic Simple cut for this exercise.

great little zipper baggie for sewing goodies
ARTISTIC SIMPLE CUT: APPLIQUE LETTERING
Monograms and lettering in embroidery is extremely popular. People love to include names and personalized monograms on their projects. Simple Cut software makes it very easy to do APPLIQUE lettering.

This is a screen shot showing up to step #19
Here is a step by step lesson.
- Open the software: Check CREATE NEW > NEXT
- Select CUT & EMBROIDERY >NEXT
- Select fabric type and colour >Next
- Select NEW GRAPHIC; HOOP TYPE & SIZE AND CUTTING MAY SIZE
- Select T icon on left of screen for True Type font
- Then click anywhere on the hoop area of the screen to activate the cursor
- Type whatever letters you wish for the word(s) or monogram
- You might also wish to select the font type and size from the drop down list available IN THE Tool Options box. See below.
- Also click the Rectangle Selection icon (top red arrow above) to select the word.
- You will notice that I chose Clarendon MT font with a height of 3 inches and I selected BOLD as well. For applique you do want to choose fonts which are relatively “fat” or thick so that they are not very thin & fiddly to cut out & applique to the project.
- Notice as well that the LIZ on the screen defaults to a net fill which is the only stitch fill available on this Simple cut software.
- To make this into an applique, these are the steps we follow:
- First “tell” the software you wish to do an applique by selecting APPLIQUE from the tab at the top pf Object Properties.
- Next assign a colour to the outline of your letters – I chose black in the upper left corner of the colour palette colours. This will be the applique stitch colour.
- And assign a colour to the applique fabric by choosing a colour and clicking on the bottom right corner of that square in the palette. I choose a turquoise blue.
- Next you need to be able to see these 2 different colours in the Sequence Manager so click on the little light bulb icon on the bottom left of the screen as below. Then click ADVANCED and OK as per arrows below.
- Notice now that there are 2 trays in the upper left of the screen. The first one which is blue is indicating with the letter A that that is the applique fabric colour.
- Tray #2 is the outline of the letters which are the applique stitches – we have not selected specific applique settings yet
- Select tray #2 for the applique outline and then the little pencil tab at the top of Object Properties.
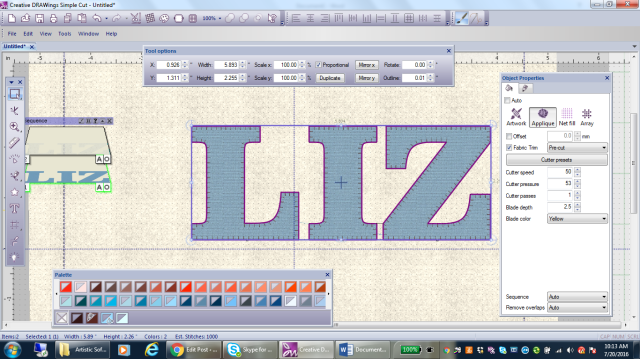
- Notice that you have almost 400 different applique stitches in Object Properties to choose from. Scroll down until you find one suitable for your project.
- Notice also that there are tabs for Running stitches as well as Satin Serial. Make your selections.
- The selected applique stitch is #80. It is black in colour an has a stitch length of 5.2mm – see the Object properties box. This can be adjusted by checking the Length box and changing the numbers.
- In addition, adjustments can be made in the Tool Options box : Outline size – this is stitch width.
- The width and height in the Tool Options box refers to the size of the lettering – which can be adjusted as well.

- Another interesting adjustment option is Mirror style in the Object Properties box which allows you to flip stitches inwards or outwards depending on the effect desired. Applique stitch #94, for example, when mirror style is checked,becomes a great invisible applique stitch.
- Remove overlaps is a great software feature to have in Simple cut as it will automatically remove overlapping appliques – removing the potential build up of overlapping layers of fabric.
- After you have selected and adjusted all the applicable settings, you are ready to cut the prepared fabric and embroidery the applique in the hoop.
- File > Save as should be done first so that you have the embroidery design saved on a USB stick (or whichever other means of transferring the design to the embroidery machine that you prefer to use). Save in a Drawings file format in case you wish to come back and do any editing. AND save in the format for your embroidery
- We will save as a jef file. Janome Generic is one option and OKThe software will then advise how many stitches in total there are.
- The fabric would need to be prepared with Terial magic and/or fusible web. Adhere the prepared fabric to the HIGH tac cutting mat and tape the edge with painters tape to ensure it does not lift during the cutting process.
- You would also at this point, ensure you have the Artistic Edge 15 Digital cutter connected the the computer – either wirelessly or with the supplied cable. File > Export > to cutters.

- Select the applicable cutter – in our case this is the Artistic Edge cutter

- This Cutter screen shows all the applicable. settings and adjustments. Starting in top right corner & going clockwise:
- Magenta dot is the exact correlation of where the cutter blade will cut. This magenta dot is the spot where the red laser dot shines on the cutting mat. Move the blade using the jog arrow keys is the red laser dot is not exactly whre it is required on the mat/fabric.
- The jog arrow keys move the cutting blade to where it is required. Use Control & shift keys as indicated for finer or larger positioning movements of the cutting blade cartridge.
- Trace is a most useful function for checking where the cutting will occur.
- Cut is the button to press when all adjustments are as desired and trace & test have been done.
- Test is also useful to see if the blade depth and pressure settings are correct for the project being cut.
- Frame – if checked a square or rectangle will be cut outside the cut shape. Useful for mirror/negative image cuts
- Pressure refers to the pressure at which the blade will press down during cutting. The least amount to cut through the material on the mat is preferred to prevent unnecessary scoring of the mat surface.
- Speed at which the cutter operates may also be adjusted.

Close up showing the great job the Simple Cut software did of digitizing the applique stitching around the applique letters.
Now there are lots of steps above (41 to be exact) …..BUT I only did that to divide the process up into easy to follow “bite sized” pieces. It is actually quite easy. I can digitize and get to the point of sending any applique to the cutter in less than 3-5 minutes…..yes, I’m not telling a fib! It is pretty simple……not called Simple Cut software for no reason!
Obviously you don’t have to use the letters L-I-Z. You may use your own words or graphic fonts. Here are a few other examples of appliques done using exactly the same technique outlines step-by-step above:

Circle shapes instead of a font

And the star shape instead of a font – same technique

A close up of the lettering digitizing and cut with the Artistic cutter Simple cut software. I think you might just be able to make out the applique stitches. There are HUNDREDS of different applique stitches to choose in this software – it really is amazing. Thank you Langley Vacuum & Sewing for this pic.

Hello Baby cut with the Artistic Edge cutter and appliques with machine applique stitches – just because variety is the spice of life!

And this quilt block is actually an appliqued FONT. Yes, it is a graphic font of a wide variety of flowers. Cant recall which letter of the alphabet this tulip was – possibly R? So this was done using the Text tool! We truly believe this is the simplest and quickest way to do applique alphabets & lettering with either graphic or text fonts.


1. Thanks for the tutorial. Please follow up with one dealing with scanning our own image, cutting and digitizing the appliqué
________________________________
LikeLike
Hi Carol,
Glad you found this useful. Are you aware that there are lots of video’s on You Tube and Itunes offering tutorials on the Artistic Edge cutter? The topic you request is already covered in at least one of these video’s: https://www.youtube.com/watch?v=V1mYVnx5i4I Easily cut Applique with Artistic Edge. You might like to check these out.
Liz
JANOME CANADA
LikeLike
Thanks Liz. I needed this helpful post. Been avoiding trying the cutter as I get lost and end up with a mess. Anne
Sent from my iPad
>
LikeLike
Thank you, thank you. I’ve been waiting for an article like this. I love doing machine applique and it’s been difficult finding detailed directions using the Edge and the Simple Cut software.
LikeLike
Hi Sheila,
Glad you are pleased. We are sure you will find this helpful.
Liz
JANOME CANADA
LikeLike