

This rather novel idea came from one of the Janome America Educators: Sam Fung. (Thank you, Sam!). I really liked the concept and decided I just had to make the project. I was fortunate enough to pick up a sewing show bargain a while back of long, heavy duty zippers. They were all the same length but in a range of pleasing colours. Of course, all the zippers could be the same colour OR you could do “stripes” of just 2 or 3 colours.

The project instructions called for working on a piece of CUT AWAY Stabilizer. I decided to make a bag large enough for my iPad and/or a notebook seeing as I always seem to be toting these items around. I cut the stabilizer accordingly large enough for that size bag. First a line was marked down the middle as the idea was to start there & work outwards to the left & right of center. The first zipper was laid on top of the marked line right side of the zipper facing upwards. Then I used my regular Janome sewing foot A, and moving my needle position, to stitch along the edge of the zipper (like a top stitching). I repeated this on the other side of the zipper.

HINT: If I make another bag like this, I would use an invisible thread in my needle or a thread colour which blends more with the colour of the zipper. My straight stitching showed a little too much under some of my dec stitches. Confessions of a Sewaholic? ………there is another confession: think things through before getting carried away with the fun of the project!

Now keep going with 2nd, 3rd, 4th, 5th zippers either side of the center lining each subsequent zipper up with the previous one. No need to overlap them, just butt them right up against the previously sewn one. Keep going until your bag is the width you require …..or you run out of zippers?!
Now select an appropriate decorative thread (poly embroidery thread? cotton variegated?…..whatever you like) and stitch over the “join” between each zipper with a decorative stitch. You may do the same dec. stitch throughout but I thought it was more fun to experiment with a bunch of different stitches to add variety to my bag.

HINT: Before stitching on the bag, do a test stitch out on a scrap of fabric and stabilizer. Check you are happy with the stitch width and length settings as well as your thread colour etc. I always like to do this as it is so much better than having to unpick some stitching I don’t like so much once it is stitched. Suggestion: try out some of those decorative stitches on your lovely Janome sewing machine that you have not used before! You will be amazed at the pleasing results you will achieve once you actually stitch them out. Many people tell me this: “oh I don’t use all those stitches” and for the life of me, I am real surprized as one of the most satisfying and fun exercises for me is to play with these stitches and see what they look like with different thread types, colours and stitch settings. You may be quite amazed at how different these stitches look when you change stitch width & length. SEW much FUN!
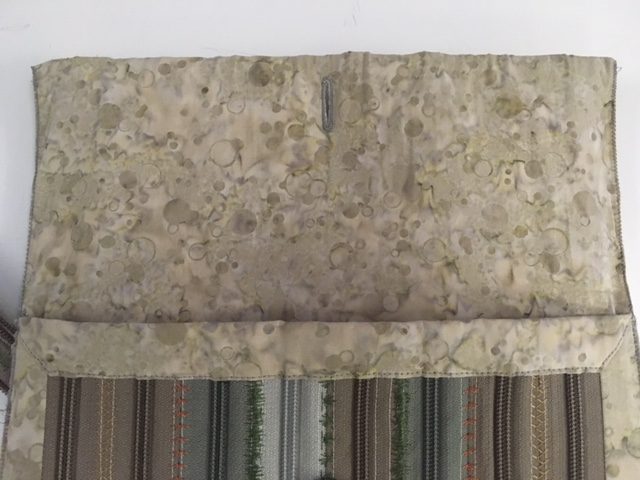
When you have finished all this wonderful dec. stitching, the bag is ready to construct. I first trimmed the bag to the size I required. I then lined it with quilting cotton fabric by sewing along 3 sides with the quilting cotton & zipper sections right sides together. I turned it out & pressed carefully. The top flap edge was folded over and tucked behind the end of the zippers. I left the zipper pulls on the zippers as I felt it was a funky feature – although non-functional. I finished the front top edge under the flap by folding over the cotton lining and making a little mitered corner.
Fold the front of the bag up and the flap over. Secure with velcro or a magnetic clasp or a buttonhole and button as in my sample. The only thing remaining is to sew the 2 side seams of the bag which were double folds of the cotton lining fabric. I lined the edges up, held in place with Clover clips and did a small zig-zag stitch along the edge of the seam on the outside of the bag. Of course, this could have been done on the inside of the bag…….it was just pretty thick & bulky at this stage and I did not feel like “fighting” with turning out and making corners neat. So an exposed seam was what it became! “Pick your battles” can sometimes be an appropriate mantra!

side seams sewed with exposed zig-zag stitching
And I used pieces of “left-over” zipper to make a tab or loop to carry the bag. My bag is rather more of a tablet or iPad bag than an messenger bag.

Split the left-over zipper into the 2 halves , lay one half on top of the other with the zipper teeth facing outwards and sew a decorative stitch down the middle. Insert the loop into the side seam before sewing that closed.
Zippers sure have some wonderful non-functional applications. Zippers as embellishment? Think bags like this; pillows; garments for a decorative rather than functional zipper…….. We think Sam’s project idea was great even though we ended up making a different version of his idea. Do you think you might look at zippers in a whole new light now?


I want one – it’s on my “sewing to do” list now!
LikeLike