


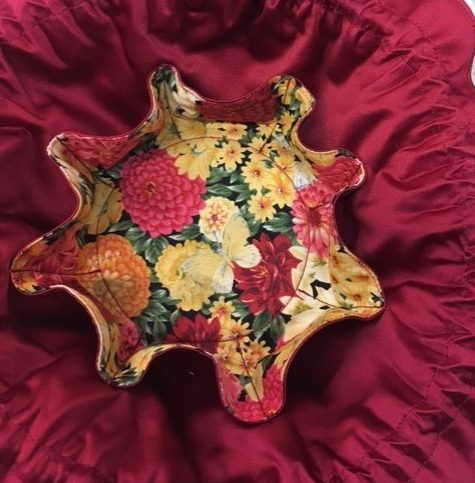
I have had one of these useful little jewelry keepers for many, many years. My late cousin (who I remember very fondly) made one for me as a gift and I have had it since before I emigrated to Canada. So you can imagine how interested I was back in November at our Christmas Janome Club party evening at Langley Vacuum & Sewing when Donna Mae showed her version of this same type of little pouch. She had made a whole bunch of them – as she regularly does with her sewing projects: for gifts and charity sewing. GREAT for storing your rings, earrings and necklaces, etc – use a different little pocket for the various items and store bigger items in the centre. It is a lovely little pouch which is light and small enough for traveling.

She promised to write up the instructions so that I could share these with you on janomelife. Thank you Donna Mae. Here goes:
Supplies:
- 2 pieces of 1/4 or 3/8 inch cording about 50 inches long
- 1 fat quarter of print fabric & equivalent size of soft satin or silk (can be poly blend) coordinating colour for the inside.
- Thread to match
- Options for the Janome foot to use: Janome A foot for general sewing; Acufeed Flex foot or Even Feed (or Walking) foot; OR HP foot and HP needle plate currently only available on the incredible Janome MC9400 – which is absolutely amazing for sewing straight stitching at speed and on curves……you gotta try it to see what I mean – seriously! See pic below.

- Pregathered lace – sufficient to go around the circumference of the larger circle.
- For a firm bottom to the bag, cut a 3,5 inch circle in plastic – a sour cream or cottage cheese lid works just great!
- Fray check
Instructions for sewing:
- From both fabrics cut one 13,5 inch and one 8,5 inch circle = 4 circles.
- On the large print fabric circle, sew pre-gathered lace (1/2 or 3/4 inch wide) all around. Suggestion: zig-zag this with a small zig – zag (SW2 & SL2) on the edge of the circle with the lace facing towards the centre of the circle.

This shows the outside of the pouch with the lace sandwiched between the 2 circles of fabric and the draw strings – instructions further down.
- On the silk or satin lining (of both sets of circles), fold in half & then in half again and mark a cross. Then cut 1.5 – 2 inch cross in the centre of each. This will enable you to turn the circles right side out after you sew the print & satin/silk lining together.
- Sew the circles together with 1/4 inch seam all around. Do this for both the sets of circles. Each set has a print fabric side and lining fabric side. Donna Mae used Roxanne’s basting glue to hold the circles together for a smooth seam – she says to be sure to tuck the lace inside of the large circle so that when you turn the circle, the lace will be on the edge.
- Turn the circles right side out & press. You will have a 13 inch and an 8 inch circle – both double layer of fabric. Only the larger circle has lace. The inner/smaller circle has a flat edge which you may top stitch if you prefer.

This shows the 2 circles positioned, stitched in place and the channel or casing for the drawstrings
- Place the 3.5 inch plastic circle in the centre of the large circle and glue in place.
- Then place the smaller fabric circle over the plastic and glue this in place as well. Let the glue dry.
- Stitch around the plastic through both circles (4 layers of fabric) by feeling the edge of the plastic with your finger as you sew.
- To make pockets on the small circle, divide the space from the plastic centre outwards into 8 equal spaces and stitch with a smallish straight stitch – suggestion 1.8 or 2mm. Back stitch at the edge of the pocket to secure the “tops” of the pockets.
- To make slots for the drawstrings: Measure down 1 inch from the edge on the large, lace edged circle and mark all the way around the circle.
- Sew a straight stitch using our Janome Foot A or Acufeed Flex or Janome even feed(walking foot )- 3 options on this marking.
- Measure down 1/2 inch and mark & sew this too as above.
- You have now made a channel or casing for your cording/drawstrings.
- On the print side fabric, cut a little 1/4 inch slit in the casing/channel and fray check the edges of the slit.
- Repeat this half way around the circle.
- Thread one cord through the one slit and have it come through the same hole. Tie the ends.
- Repeat with a second piece of cord threading it in & out of the other slit.
- If you pull the drawstrings you should have a pouch that looks like a flower!


Liz, I have been unable to get an answer on this, could you please help? I own a Janome Skyline S5 and will be moving to Germany in a few months. Someone told me they thought this machine has auto worldwide voltage, so all I would need is a new plug. Can you confirm this? Otherwise I need to purchase a new machine before I go, and I really like Janome and the Skyline. Does Janome have any worldwide voltage machines? I really don’t want to have to switch to a Bernina, but I have been able to find them in that brand Please help! Thanks!
LikeLike
Hi Ann,
Yes, the Skyline S5 will work in Germany. You just need a new power cord – compatible with their electrical outlets.
Liz
JANOME CANADA
LikeLike
So pretty! I’ve made these, as well, after receiving one as a gift many years ago, but never put lace on mine. It really adds a lot to the appearance, doesn’t it? Love it!
LikeLike