Janome Blind Hem Foot

Sewing a Blind Hem can sometimes be a little bit tricky as you have to fold the fabric onto itself while leaving the hem edge exposed. Most of the Blind Hem stitch will go along the hem edge, but a small zig zag stitch will pierce the fold of the fabric, which actually holds the hem in place. Depending on which Janome machine you have, using a Blind Hem foot goes a long way to help improve this technique.

Blind Hems are all around us; draperies and slipcovers, and more specifically, on us, in clothing. While blind hems are most often found on dress pants, or slacks, they are also great for dresses, skirts and knit shirts. Using the Janome Blind Hem foot will give your garments a professional finish. Matching thread to the fabric will minimize the appearance of the Blind Hem stitch on the right side.

There are two types of the Janome Blind Hem Foot; the standard Blind Hem Foot (G) with it’s black metal guide in the center of the foot, and the Blind Hem Foot Adjustable; one for top loading models, as the foot in the top right in the photo above, and one for front loading models.

Watch how the machine stitches a straight line and then takes a bite in the fold of the fabric.

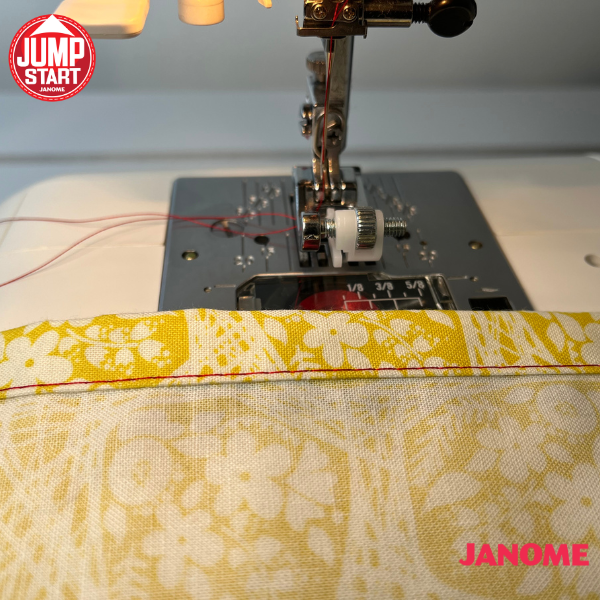
The deeper the “bite” in the fold of the fabric, the more the stitch will appear on the right side of the fabric. A contrasting thread color adds a unique decorative element on the right side of the fabric.

Lets begin with one of the most commonly found accessories included with many Janome models.

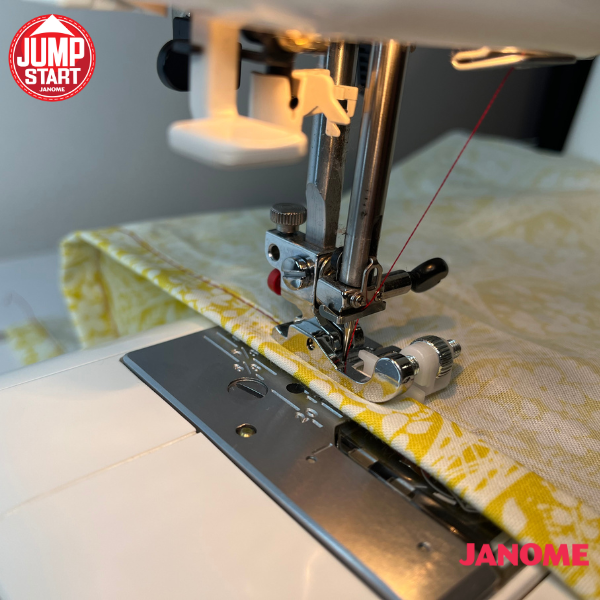
Standard Blind Hem Foot (G)

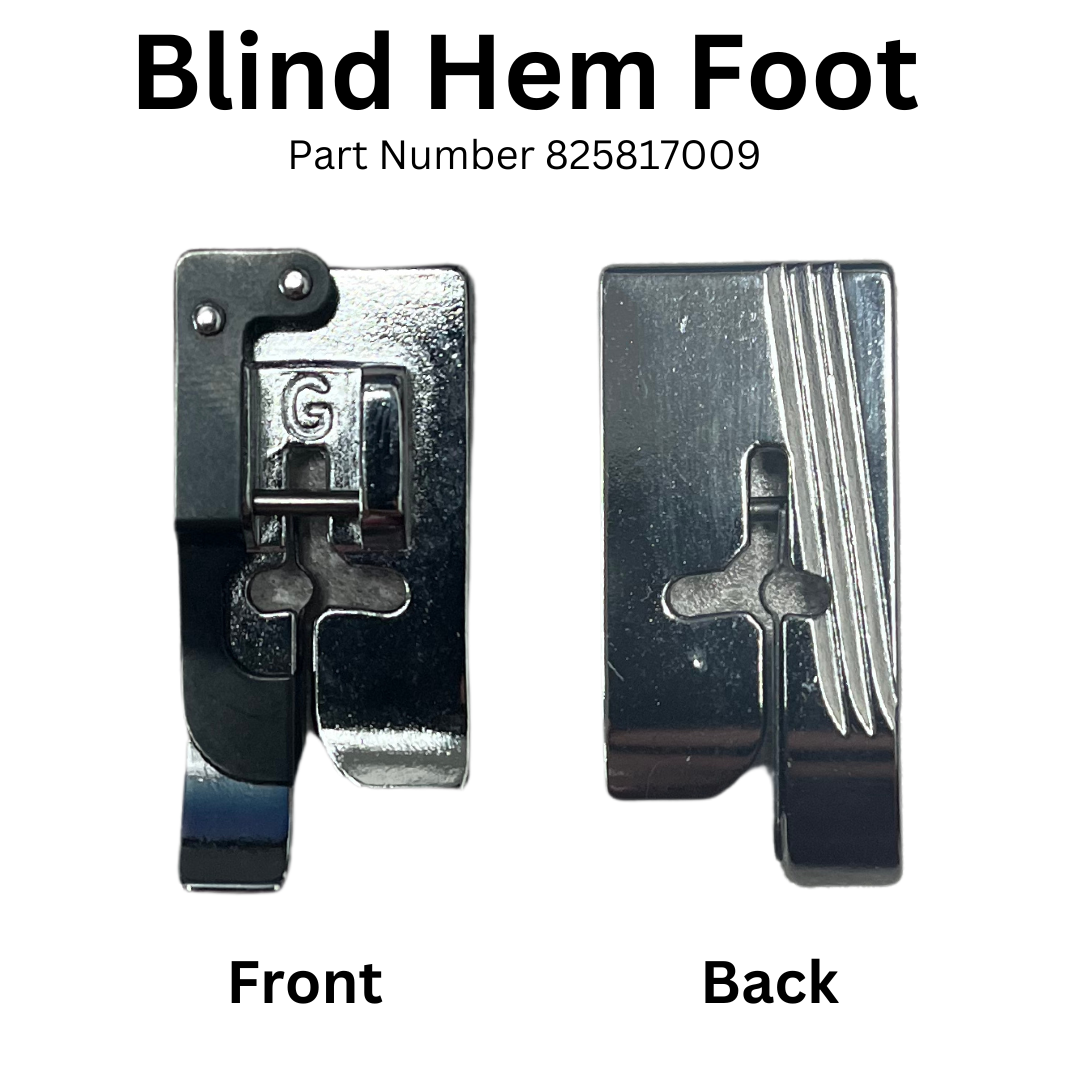
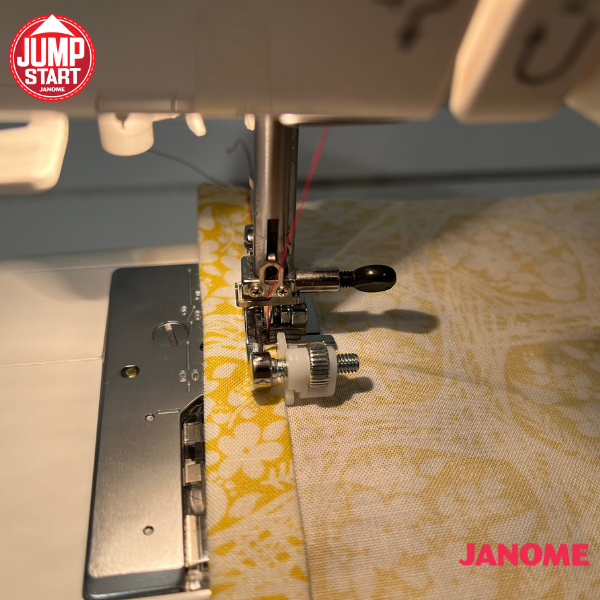
This foot has a metal guide in the center and three grooves on the underside. During stitching, the fold of the fabric fits snugly against the guide in the foot for accuracy while the groove underneath helps to prevent slipping. The stitches easily pass under the foot. The needle swings over the metal guide creating slack in the upper thread tension so that the “pick” or “bite” of the stitch in the fold of the fabric is almost invisible.

What Machines will it fit?

All top loading 7MM Stitch Width machines. This foot also is available for all top loading 9MM machines, Blind Hem Foot G | Part Number: 859807001

Reference the Accessory Compatibility Guide below.


Blind Hem Foot Adjustable

What Machines will it fit?

All Front Loading, 5MM Max Stitch Width Models

Using the adjustable guide along with the adjustable zig zag width on your machine will allow you to set the amount of bite you want your needle to reach on your fabric. 

The Adjustable Blind Hem foot is demonstrated on the Janome HD-1000 above. Check out the Janome Accessories Guide to find all the presser feet and attachments available for all Janome models.


What Machines will it fit?

All top loading 7MM Stitch Width machines.

How to Use:

To many, a Blind Hem may seem like a daunting task to try to figure out which side is up, where the stitches go and how to get the desired end result. Not to worry, Janome has got you covered! Most Janome sewing machines come with a built-in Blind Hem stitch and Blind Hem foot, or you can purchase one separately.


Top Stitching

The Adjustable Blind Hem foot, can also be used for more than just hems. Because of the design and ability to adjust the width, this is a great tool to be used for topstitching to obtain great results. Since Topstitching is a decorative stitch usually on a finished product, its important to keep this stitch as straight and consistent as possible.

The Janome Blind Hem Foot is not just for blind hemming. It can also be used as a seam guide, by either adjusting the needle position, or by adjusting the guide on the foot, which is compatible with your machine. This can be used for edge binding, decorative stitching, or as a guide if you feel like you need some help sewing a straight line! It’s a versatile tool and great addition to the new sewist’s go to accessory line up!

Posted in Janome Jumpstart, Janome Sewing Machine | Tagged , , , , , , , , , , , , , , , | Comments Off on Janome Blind Hem Foot

Cloth Napkins with the Janome 9mm Bi-Level Foot

I love some quick but useful projects. Many years ago I made a bunch of napkins for my niece P, and for my own kids, as well. P has used these napkins in her lunch nonstop and needed some new ones. I picked out the fabrics I thought P would love the most and started to whip them up. There is definitely more ironing than sewing with these but I’m ok with that. 

At first, I thought I could remember how to make my mitred corners, but that was a lie. I had to go back to a cloth napkin tutorial I wrote for Janome Life awhile ago. It’s easy to find previous posts using the Search box with the subject of what you’re looking for.

Look at how awesome those corners are! I’m impressed with past me!

Little side note: We would love to hear in what format you’d prefer tutorials. Do you like short videos with no talking but the words on the screen? Or, do you like an in-depth video with close-ups and detailed verbal instructions? Maybe you love detailed written instructions with lots of photos? Or, maybe you are like me and just want photos. Leave a comment below so we can make sure to make the types of tutorials you use most!

When it came time to stitch the hem down, I started to think about which presser foot I could use that would make this nice and easy. We all know there is a specific use for each foot, BUT we can use many presser feet for other applications to get even more use out of them.

I could have gone with my Janome HP (high performance) foot (865803006) which gives me a clear view as it’s nice and narrow. It would have been a solid choice. My only hold back was how it would sit on the hem. I feel I may have been fighting with it to stay exactly where I wanted as it probably would have wanted to have the right side off the hem and my stitches would have been too close to the edge for my liking. 

A Janome Ditch Quilting foot (202087003 for 9mm machines) would have been great on my Janome Continental M7 for lining up the edge against the long guide in the centre of the foot and keeping my stitches in the right spot. My only hesitation would have been the guide hitting the next edge at the corners. Other than that, this foot would have worked perfectly. 

One foot I often repurpose for other techniques is the G foot or Janome Blind Hem Foot 859807001 for 9mm machines) This foot would have let me guide along the edge and have my stitches sink into the hem at a great location. The guide on it isn’t as large as the Ditch Quilting foot, so I would possibly run into less issues at the corners.

However, the choice I went with was the Janome Bi-Level Foot (202461005 for 9mm machines). This foot allowed me to follow the edge of the hem and have my stitches sink in exactly where I wanted them on the hem. The curve and smoothness of the bottom of the foot allowed it to float over the hem at the corners. I also had enough visibility to make sure I could pivot right at the mitred corners. It worked like a charm!

I’m keeping this purple linen napkin for myself. It is a great use of the scraps leftover from a dress I made a few years back. P is getting all the fun ones! 

What foot would you have used to hem napkins? Drop your suggestions in the comments below!

Stitch On!

~ AmandaBee

Posted in Fearless Sewing with Janome, Janome Accessories | Tagged , , , , , | 8 Comments

Introducing a New Janome Canada Educator: Tobias!

Hello! My name is Tobias Binder, a new addition to the Janome Canada Educators team! I am so excited to be onboard with Janome, the supreme makers of sewing machines. I’d like to share a little bit about myself and what I like to create.

My sewing journey began years ago while working as a summer camp swim instructor. One of my coworkers made a fabulous pair of split pants; cutting two legs from separate pants and stitching them together. I was instantly inspired and wanted to start sewing immediately. My Great Aunt, an avid sewist herself, gifted me a basic sewing machine as an early birthday gift. These split pants were one of my first projects.

Soon after, I became interested in repairing and restoring vintage sewing machines. I spent a couple of years teaching myself before wanting to progress to computerized sewing and embroidery machines. I took a technical training course in Texas where I learned to fix machines like a pro! For a few years, I ran a sewing machine repair business out of my home in Guelph, ON. Currently, I love volunteering at the Guelph Tool Library repair cafes, where I can give back to the community.

I fell in love with Janome at my workbench. Every single Janome machine I took apart proved to be well-made and worthwhile. At every price point, you can expect quality. Even my older Janome ‘MyLock’ serger has never let me down.

Sustainability plays a big part in my sewing projects. Almost all the fabric I use is purchased second hand or repurposed. It’s great for the environment, and economical too! Additionally, the limitations of finding fabric force me to think and solve problems creatively, resulting in unique finished projects. Here are two pairs of pants I made. One using two corduroy fabrics (with matching bag), and these jeans using four denim fabrics!

Since the start of 2021, I’ve worked as the Chief Seamster for a vintage clothing store here in Guelph, ON. My main task is sewing their ‘rework’ collection; taking parts from t-shirts/sweatshirts and sewing them into another, creating a unique garment. Naturally, I end up with an abundance of sweatshirt scraps, so I put those to good use in my own projects, making my own garments using multiple fabrics. I am ardent about clean and professional seam finishes, none of that raw edge DIY stuff for me.

I also play the drums in a hip R&B band called SHEBAD. I love making outfits for myself and my band members to wear onstage.

More recently, I started a tiktok account, posting sewing and sewing machine related videos. Everything from comedy skits to educational content! Janome Canada also recently started a tiktok account, so be sure to check it out, too. You may also find me on Instagram (@tobias.binder_). I am greatly looking forward to making entertaining and informative videos for Janome Canada’s social media, and of course, contributing to the Janome Life blog!

Our National Education Manager, Michael, and I recorded a little video welcoming me to the team, which is now posted to the Janome HQ You Tube channel . Be sure to subscribe and hit the notifications bell so you know when new videos are posted!

Happy Sewing!

Posted in Janome Educator, Janome Sewing Machine | Tagged , , , , , , , , , , , , , , | 4 Comments

We Interrupt Our Regularly Scheduled Broadcast….

We sew appreciate your loyalty and support of Janome HQ, but alas, there will be NO LIVE at 1pm EST @janomehq Instagram page this afternoon.

However, I will be back LIVE Wednesday, March 8th, 2023!

JMMMT Artwork 2

This is the perfect time to get caught up on any presentations you might have missed as they’re all stored in IGTV on the @janomehq Instagram Page and on the Janome HQ You Tube channel.

What machine and Janome goodies will we talk about on Magical Machine Mystery Tour? It’s a MYSTERY so you must tune in each week for the big reveal!

Want to know answers to questions about your machine or about Janome products? Tune in every other week for Ask Janome HQ. Depending on the question, it may be answered LIVE!

Don’t worry if you can’t make the LIVE presentation, though. They’ll be stored in the IGTV icon on the Janome HQ Instagram Page and later posted as videos on the Janome HQ You Tube channel.

Follow us on the Janome HQ Facebook page to see what’s new at our Janome Canada Headquarters, our Janome HQ!

Happy Sewing and #sharethejanomelove!

Posted in @JanomeHQ Instagram Live | Tagged , , , | Comments Off on We Interrupt Our Regularly Scheduled Broadcast….

Today’s Facebook LIVE – Nightgown Envelope

Celine is back LIVE every Tuesday at 3pm EST on the Janome Sewing Machines Facebook page for an entire month of sewing fun and education to help you get the most from your Janome machine!

Today, Celine will show you how to make a beautiful envelope-style bag using the embroidery machine and serger to hold a nightgown or pajamas. It would make a great gift! It’s never too early to think ahead to Christmas or an upcoming wedding.

Though Celine will be demonstrating on the fabulous Janome Continental M17, Janome’s Top of the Line machine, many times the techniques can be executed on a variety of machines so everyone can share in the fun!

Janome Continental M17.
Janome MC15000 Quilt Maker
Janome Skyline S9
Janome Skyline S7
Janome MC9850Special Edition

Check out our handy Janome Accessories Guide or click on the Accessories Tab on Janome.CA. to find the presser feet and accessories compatible with your machine. Click the Products tab, then scroll down to find “View all Accessories“. Click there to access the Search Box or to scroll through the pages to find the accessories you’d like. Click on the picture/description to find the Part Number and machine compatibility. And, as always, check with your fabulous Janome Dealer!

Don’t worry if you can’t make the LIVE. All of the presentations will be saved under the Videos tab of the Janome Sewing Machines Facebook page. Use the Search Box to find all the videos with Celine Ross.

Don’t have a Facebook account, don’t worry, they will be uploaded to the Janome HQ You Tube channel under the Facebook Live playlist to enjoy whenever you wish!

Happy Sewing!

Posted in Janome Accessory, Janome Sewing Machine, Jnaome Circular Attachment | Tagged , , , , , , , , , , , , , , , | Comments Off on Today’s Facebook LIVE – Nightgown Envelope

Loading a Quilt on a Janome Long Arm Machine

Ok, so you just bought a new Janome Long Arm Quilting machine! Now what?

Reading the Instruction Manual from cover to cover should be one of the first steps, but how to load a quilt is an important, and exciting step, too! Here are just a few tips and tricks you should know before you get started.

Press your quilt top. Turn your quilt top over and make sure the seams lie flat and are pressed in opposite directions to minimize thick seam junctions. I always tell my students; your iron is your best friend!

Make sure the quilt top lays flat. If the top is flared or has extra fullness, the quilt cannot and should not be pulled out to lay flat. If you stretch it out on the frame, the quilt will condense and bow out of shape as soon as you take it off. You can possibly take out some of the fullness with quilting patterns or techniques such as folding in a tuck that disguises the problem. This does not assure however that there may not be some puckering or tucks around the edges.

Backing. The backing should be 4″ to 5″ wider than the top all around. This allows you to pin the backing to the leaders and use the side clamps without the machine carriage running into them. The backing must be square in order for it to load properly. When possible, load the backing with the selvage to the leaders, but don’t forget to pay attention to any directional prints on your backing, though.

Batting. Same as the backing, the batting should be wider than the quilt top all around. There are so many varieties of batting out there. Make sure you choose one that suits the quilt’s intending purpose and the quilting style and design you’ve choosen.

Load the backing first. Make sure the right side of the fabric is facing down. The wrong side should be facing you. There are great Facebook videos on how to load the backing and tops. If the backing has a seam down the middle, it is best to load the seam parallel to the bars to avoid a droopy backing.

Lay the batting on top of the wrong side of the backing. Keep everything nice and smooth but avoid pulling the batting out of shape. You can choose to baste the batting onto the backing if you wish or spray baste it in place.

Load the Quilt Top. The top is now ready to be loaded by either pinning the bottom of the quilt top to the quilt top leader or by just “floating” the top onto the batting, without pinning it to the leader. The floating or pinning technique is really a personal preference. Sometimes the size and the amount of quilting you plan on doing on a quilt will determine if you should float or pin the top. For example, whenever I’m going to do a lot of dense background fill, I’ll pin the quilt top the leader, so everything stays in place and the quilt doesn’t draw up too much. Whenever I do a simple open edge-to-edge design, however, I float.

There is a printable PDF with step-by-step instructions how to load a quilt on a Janome Quilt Maker Frame by Janome America’s Longarm Quilting Specialist, Kelley McKenzie. Kelley also has a ton of videos on each of the longarm machines on Janome’s You Tube Channel.

The last little tip I can give is the magic of spray starch. If you have a quilt where the blocks create a B or C Cup bulging in the centre, you can spray starch that block and press it with a hot iron to shrink the fullness of the block a bit at a time. Same goes for wonky borders. Try it next time and you’ll be amazed how easy it is!

Don’t forget to follow all our socials like Janome HQ, Janome HQ Instagram and the Janome HQ You Tube channel.

Happy Quilting!

Monique

Posted in Janome Quilt Maker Pro, Janome Sewing Machine | Tagged , , , , , , , , , , , , , | 2 Comments

Adjusting the Serger Cutting Width

Sergers are amazing machines and one of the things we LOVE about the Janome AT2000D is right in the name; Air Threading. A quick flip of a switch and push on the lever and each looper is threaded. If you have ever threaded loopers by hand you will understand what a magical timesaver this is!

But, once you have your serger threaded, what if you want to make some adjustments?

It is easy to become overwhelmed with the dials on your serger as there’s many things, many techniques you can do on a serger. We often talk about tension, stitch length and differential feed, but I want to talk to you today about the cutting width, which is an adjustment made with the knife blade.

On the Janome AT2000D, this dial located just in front of the upper knife and it adjusts how close the knife is to the needle plate. This changes how close your cut edge of the fabric is to the needles so it will affect how your stitches look.

Why does this make a difference? As the Upper Looper and Lower Looper threads intersect around the cut edge of the fabric, the cutting width changes how close the loops of thread are to the edge of the fabric. In a perfect world, you would like these loops to sit right along the cut edge. Too close to the edge and it will scrunch your fabric up, too far from the edge and your loops will be sitting off the fabric completely. 

If your fabric is scrunched then you may be loosing accuracy in your seam allowance and your  seams may roll and be uncomfortable if it is part of a wearable item. Loops that are completely off the fabric can cause issues with snagging and become unraveled if one thread gets cut accidently.

To get the perfect loops you may have to adjust both the cutting width of the blade and the tension of the looper threads. Do not be afraid to adjust both. Writing down or marking settings before adjusting can help you reset everything in case you go way off track.

Why can’t we just set a width for this cutting and leave it there forever? All fabrics and techniques are different. I cut the below fabrics at the same cutting width setting but the stitches are different on both. Having the ability to make these adjustments really helps get the best finish on every fabric. You might make a more narrow cutting width on fine, thin fabrics, and a wider cutting width on thicker fabrics, for example.

Top: Cutting Knife Blade is too close
Bottom: Cutting Knife Blade is just right

We would love to teach you more about using your Janome Serger, whatever the model as all Janome sergers have very similar adjustments. Leave a comment below letting us know what questions you have. They could be answered LIVE during one of our Janome HQ Instagram LIVE presentations! Check out more serger tips and tricks on the Janome HQ You Tube channel!

Stitch On!

AmandaBee

Posted in Janome AT2000D serger, JANOME SERGERS | Tagged , , , , , , , , , , , , | 4 Comments

Zippy zippers

We are heading out on our first family trip in three years and of course, I had to do a few sewing projects prior to leaving. Fanny packs are all the rage right now – except you don’t wear them the same as we did “back in the day.” Now they are cross body wear.

Regardless of how you wear them, the fact that they let you have both your hands free makes one the perfect accessory for this family trip.

There are lots of patterns for making your own fanny pack or waist pack, like the Structured Waist Pack from Sew4Home. My only hesitation when I found one I liked… zippers. I don’t know why but zippers having always been a little tricky for me. Mine always seem a little off, the ends not quite meeting properly or looking a tad… unfinished.

Zippers have definitely come a long way since I first started sewing, which goes back to Home Ec days – which I LOVED!. There are many options and colours of zippers, and don’t get me started on all the options available now for zipper pulls! lol! There’s so much available now to customize.

Originally I started with a pink binding with an iridescent colour shift zip. You can see it in the top right of the photo above with all my fabric pieces laid out. While I’m sure that would have been just lovely, somewhere along the way I got the idea to change out my zip to purple which is by chance, my favourite colour.

One of the things I find that has helped me the most with my zippers; one tip which I can’t recommend enough, is to pin or use clips and make those zippers secure. Often you need to stop midway, shift around a zipper pull or adjust positioning slightly, which means your zipper can shift a little bit out of place throwing everything off. But if everything is pinned in place, there’s less chance of one side being pulled out of alignment. 

Using the correct Janome presser foot will also make a huge different and go a long way to making your zippers look professional.

The Janome Zipper foot (E) can be set to sew on each side of the zipper by adjusting the position of the foot. Not only does it help create a secure zipper with a smooth finish, it also makes a beautiful topstitch next to a zipper when you don’t have a lot of extra room for bulky sewing foot.

I just love how this side zipper turned out on this bag!

It was really easy to coordinate the perfect matching thread with this selection from Madeira. I chose the navy blue section from the bottom left, but I just as easily could have gone with a contrasting colour like red, white or light blue.

My final tip is just to be patient and keep practicing. I won’t tell you how many dresses or skirts I’ve made with a bit of an incorrect zipper placement. Start with a small projects and those that don’t depend on precision zipper skills and work your way up. You’ll find lots of helpful tips in previous Janome Life blogs by typing Zippers in the SEARCH box.

I’m so proud of this little bag! I want to wear it everywhere now and say to people when they comment on it, “sure you think that fabrics cute, but take another look at that zipper!” lol!

Do you just dive right in or are you hesitant when it comes to zipper sewing? Monochromatic or contrasting top stitching? Which is your fav? Drop your comments below! We love to hear from you!

Posted in Janome Canada Artisan, Janome Sewing Machine | Tagged , , , , , , , , , , , , | 4 Comments

Janome HQ’s Instagram LIVE TODAY, WEDNESDAY 1pm EST

Join us LIVE at 1pm EST @janomehq Instagram page every other Wednesday afternoon for our series, “Janome’s Magical Machine Mystery Tour” as we highlight a different machine in the Janome line. From entry level to Top of the Line; embroidery machines; longarm quilting machines; sergers and MORE, including some fabulous partner products to compliment those machines!

What machine and Janome goodies will we talk about this week? It’s a MYSTERY so you must tune in each week for the big reveal! Don’t worry if you can’t make the LIVE presentation, though. They’ll be stored in the IGTV icon on the Janome HQ Instagram Page and later posted as videos on the Janome HQ You Tube channel.

JMMMT Artwork 2

Follow us on the Janome HQ Facebook page to see what’s new at our Janome Canada Headquarters, our Janome HQ!

Happy Sewing and #sharethejanomelove!

Posted in @JanomeHQ Instagram Live | Tagged , , , | Comments Off on Janome HQ’s Instagram LIVE TODAY, WEDNESDAY 1pm EST

Today’s Facebook LIVE – Tea Bag Sachets

Celine is back LIVE every Tuesday at 3pm EST on the Janome Sewing Machines Facebook page for an entire month of sewing fun and education to help you get the most from your Janome machine!

Today, Celine will show you a fun project of making sachets you can use in your bathtub. Learn tips to embroider on delicate fabrics; which stabilizer, which needle. Celine shares all her secrets of success.

Though Celine will be demonstrating on the fabulous Janome Continental M17, Janome’s Top of the Line machine, many times the techniques can be executed on a variety of machines so everyone can share in the fun!

Janome Continental M17.
Janome MC15000 Quilt Maker
Janome Skyline S9
Janome Skyline S7
Janome MC9850Special Edition

Check out our handy Janome Accessories Guide or click on the Accessories Tab on Janome.CA. to find the presser feet and accessories compatible with your machine. Click the Products tab, then scroll down to find “View all Accessories“. Click there to access the Search Box or to scroll through the pages to find the accessories you’d like. Click on the picture/description to find the Part Number and machine compatibility. And, as always, check with your fabulous Janome Dealer!

Don’t worry if you can’t make the LIVE. All of the presentations will be saved under the Videos tab of the Janome Sewing Machines Facebook page. Use the Search Box to find all the videos with Celine Ross.

Don’t have a Facebook account, don’t worry, they will be uploaded to the Janome HQ You Tube channel under the Facebook Live playlist to enjoy whenever you wish!

Happy Sewing!

Posted in Janome Accessory, Janome Sewing Machine, Jnaome Circular Attachment | Tagged , , , , , , , , , , , , , , , | Comments Off on Today’s Facebook LIVE – Tea Bag Sachets